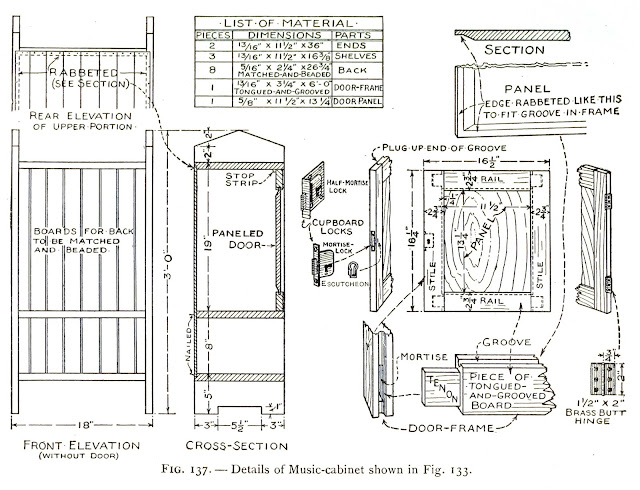
First, prepare the end pieces and the shelves (Fig. 137), then after these pieces have been fastened together, put on the backboards and make and hang the paneled door.
The best scheme for making a tight-fitting back is to use matched-and-beaded boards (known as M-&-B ceiling). A board always shrinks crosswise of the grain (but not lengthwise), and also expands and contracts to a certain extent with the changes in the atmosphere, and this movement must be provided for in joining pieces together, or there will be trouble.
Take the music-cabinet, for example. Here the back will shrink and swell in the width of the cabinet, but the shelves will not, as their grain runs the other way, and under these conditions, if the backboards are wide, and are fitted snugly and nailed to the shelves, they are bound to split in shrinking or buckle (bulge out) in swelling, for the shelves will not move with them; but if the boards are narrow, the movement in each piece will, of course, be very slight, and the small amount that there is may be taken care of in the joints, where, if the boards are matched and beaded, it will not be noticeable. Rabbet the two side pieces and the top and bottom shelf so the boards of the back will set flush with the edges, and plane off enough of the back edge of the middle shelf to allow the boards to pass (see Cross-section). Cut the rabbets about 1/2 inch wide by the thickness of the boards. Use finishing nails for nailing together the cabinet pieces, and nail the boards of the back to the rabbeted surfaces as shown in the rear elevation.
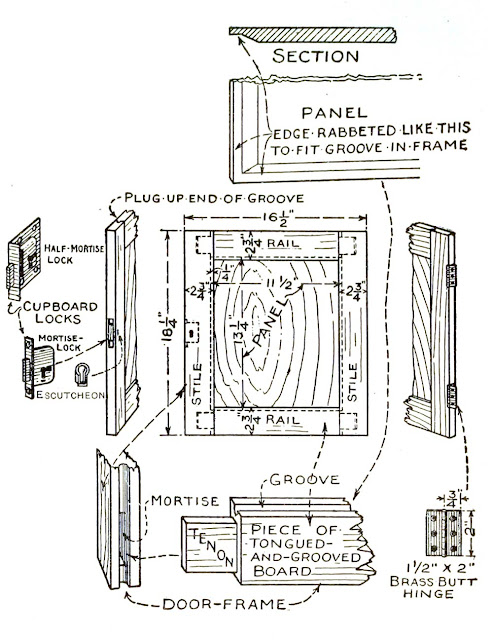
The details show an original idea for constructing a paneled door, which so simplifies the work that any boy will find such a door easy to make. The rails and the stiles of the frame are made of a tongued-and-grooved board with the groove left on it to receive the edges of the panel. Tenons are cut upon the ends of the rails, and mortises are made in the stiles to receive them, and the board used for the panel is rabbeted on the edges of one face to fit the grooves in the frame. The rail tenons should be about 1 1/4 inches long, and the mortises a trifle deeper, and the panel board must fit loosely in the frame, with plenty of space between its edges and the bottom of the groove, to allow for the movement caused by the expansion and contraction of the wood. Glue the frame together, but leave the panel loose. A paneled door is usually made a trifle larger all around than the opening in which it is to be hinged, to allow for fitting it to the opening; the dimensions given provide for this.
Buy a pair of brass butts of the size shown with which to hinge the door in place, and screw these to the edge of the door, notching the edge enough to receive the full thickness of the folded hinge. A cupboard lock, which sets into a mortise cut in the edge of the door style, as shown in the detail (a Mortise-lock), makes the neatest appearing job, but the lock is shown just above it (a Half-mortise lock) is easier to put on as the cutting is done on the inside face of the stile. With either lock, the selvage-plate [the front plate through which the bolt passes] must be set flush with the edge of the stile. Upon the face of the stile carefully locate the êåó-pin, then cut a hole a trifle larger than the key through the stile into the mortise. After the lock has been screwed in place and properly adjusted, tack an escutcheon plate over the keyhole to finish it off. Locate where the lock bolt strikes the side of the cabinet and cut a small pocket at that point for it to turn into. Directly inside of the door tack a narrow strip of wood to the underside of the top shelf and another down each side, as stop strips for the door to strike against. These must be adjusted so the door will close properly.
Excerpt from the book: "Handicraft for handy boys; practical plans for work and play, with many ideas for earning money" by Hall, A. Neely (Albert Neely), / Publication date 1911


Social Plugin