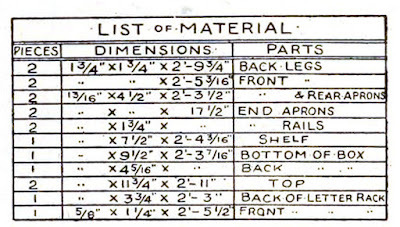
After preparing the legs according to the detail (Fig. 145), cut the end aprons and rails, and mortise the legs to receive their ends. Make the front and rear aprons and cut mortises in the legs to receive them, then prepare the shelf and rabbet the end rails for its ends to set in.
The material box is completed by adding two boards, one for the bottom and the other for the back; these may be fastened in place with finishing nails. As the front portion of the desk top is hinged to the back portion, to give access to the material box, you will be saved the work of gluing up a wide top.
The backboard of the top must be fitted neatly around the back legs. Hinge the front portion of the top to the back portion with a pair of brass butts 1 1/2 inches by 2 inches in size. The back legs must be mortised as shown, to receive the ends of the back of the letter-rack, and this back piece must be slipped into place at the same time that the shelf ends are slipped into the mortises in the end rails. The front of the letter-rack is screwed to the front face of the back legs.
As mentioned before, in a big piece of work where a number of the parts are mortised-and-tenoned, fit everything together, first, before gluing or nailing any part in place permanently.
Excerpt from the book: "Handicraft for handy boys; practical plans for work and play, with many ideas for earning money" by Hall, A. Neely (Albert Neely), / Publication date 1911


Social Plugin