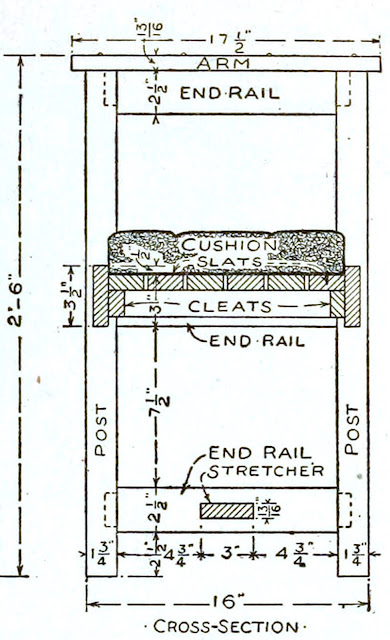
First, prepare the four corner posts and the end rails (Fig. 143), and cut mortises in the posts 3/4 inch deep to receive the ends of the rails, then prepare the front and rear rails as shown and make mortises in the posts 1/2 inch deep to receive them.
Next cut the stretcher as it is detailed in the plan, mortise the lower end rails for its ends to run through, and prepare pins to fit the stretcher's mortises.
Nail a cleat to the inside face of the four-seat rails to support the seat slats, then cut the slats to the proper length and nail them to the cleats, spacing them 1/4 inch apart. Screw the arm pieces to the tops of the posts and to the top end rails, using round-head screws.
You will probably require the assistance in making the cushion for the seat. This should be about 2 1/2 inches thick and should be stuffed with hair and tacked every 4 or 5 inches with strong linen thread to hold the filling in place. By examining a cushion, or even a bed mattress, the method of sewing together the cover so as to give the cushion a square box effect will be understood. The cushion will have to be pliable enough at the corners to fit around the corner posts, as shown.
Excerpt from the book: "Handicraft for handy boys; practical plans for work and play, with many ideas for earning money" by Hall, A. Neely (Albert Neely), / Publication date 1911


